Tree Shaking in JavaScript Applications: Boosting Performance with Dead-Code Elimination
Introduction:
Tree Shaking is nothing but JavaScript context for dead-code elimination.
Then why call it specially Tree-shaking ? We can visualise the application’s exports and imports in the form of a tree. The healthy leaves and branches represent used imports of the application while dead leaves symbolise unused code. Shaking the tree would eliminate all our unused code.
Most of the libraries we import into our apps has ton of components and we need very few components most of the time. Our final build should only contain the components that are used and eliminate the remaining components which are not used. But most of the times, we end up having all the components in the final build. So we need to shake the tree and remove the dead leaves.
How Tree Shaking Works:
At the heart of tree shaking lies the principle of static analysis. Modern bundlers like Webpack analyze the codebase, determining which modules are actually used and which ones are redundant. This analysis enables the bundler to eliminate unused code during the build process, resulting in a leaner, more efficient bundle. Crucially, tree shaking relies on the adoption of ES6 module syntax, allowing developers to import and export modules in a way that facilitates this optimization.
When Should You Tree Shake?
Anytime you want to:
1. Reduce your app’s initial load time
2. Make your app as lightweight as possible
Some good times to tree shake are:
1. When deploying your React app to production
2. For npm packages to make them tiny.
Tree Shaking in React:
React is a popular JavaScript library for building user interfaces. When building a React application, you often use various third-party libraries and modules to help with things like state management, routing, and more.
However, these third-party libraries often come with a lot of code that you may not actually use in your application. This is where tree shaking comes in.
By using tree shaking in your React application, you can eliminate the unused code from third-party libraries, reducing the size of your final bundle and making your application faster and more efficient.
Here’s how you enable tree shaking in a React app:
- Import modules using
import:
import React from 'react'- Bundle your app with Webpack or Rollup. They support tree shaking!
- Configure tree shaking in your bundler:
// Webpack
optimization: {
  usedExports: true
}- Only
importwhat you actually use:
import { useState } from 'react'Not:
import React from 'react'Without babel-preset-env configured to leave ES6 modules, CommonJS code won’t be tree shaken.
{
  "presets": [
    ["env", {
      "modules": false
    }]
  ]
}
See it in Action
Let’s look at an example app with and without tree shaking:
// Without Tree Shaking
import * as react from 'react'
// Bundle 500KB
// With Tree Shaking
import { useState } from 'react'
// Bundle 120KB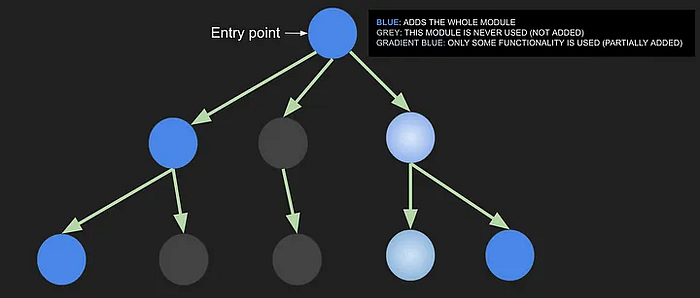
Use Cases and Benefits: Transforming Applications
Tree shaking finds its application in various scenarios, transforming the way developers handle dependencies and optimize their applications:
Optimizing Large Libraries:
Tree shaking shines when dealing with substantial utility libraries like lodash. By importing only the necessary functions, developers drastically reduce the bundle size, ensuring a more responsive application.
Conditional Imports and Dynamic Code Splitting:
Tree shaking elegantly handles conditional imports and dynamic code splitting. When modules are imported based on specific conditions, tree shaking ensures that only the required modules are bundled, eliminating any unused code paths and enhancing efficiency.
Tools for analyzing the bundle
Several tools are available for analyzing the React bundle. Webpack Bundle Analyzer and Source Map Explorer are popular tools that can be used to analyze the bundle’s components and their sizes.
In this article, we will be taking a glance at some tools, and then we will learn how to use them to Optimize our React bundle size.
Webpack bundle Analyzer
If you are using webpack as a bundler this should be your go-to point for getting a better look at your bundle. It is very easy to install and use.

# NPM
npm install --save-dev webpack-bundle-analyzer
# Yarn
yarn add -D webpack-bundle-analyzer
for Webpack config:
const BundleAnalyzerPlugin = require('webpack-bundle-analyzer').BundleAnalyzerPlugin;

module.exports = {
  // other webpack config options
  plugins: [
    // other plugins
    new BundleAnalyzerPlugin(),
  ],
};
Source Map
Similarly, you can use a generated Source Map to analyze the bundle and I identify the big chunks in your javascript bundle.
Here is a good npm library to achieve that.
Conclusion -
Building applications with several libraries without implementing tree-shaking will drastically affect the performance of the application. Therefore, it is an ultimate rule to always include good tree-shaking practices in order to improve web performance.
Thank you for reading!
I hope this article has provided you with valuable insights into the world of tree shaking and its applications in JavaScript development. If you found this information helpful, please consider sharing it with your network. Stay updated with more insightful content by following me on LinkedIn.
Let’s connect!
💼 𝐋𝐢𝐧𝐤𝐞𝐝𝐈𝐧 — https://www.linkedin.com/in/kartikbudhraja/
🔗 𝐌𝐞𝐝𝐢𝐮𝐦 — https://kartikbudhraja.medium.com/